Sharpen Scissors with a Whetstone: Grit and Angle
- Review by
- Edge & Pivot Editorial Team
- Last checked
- First published
- Filed under
- Sharpening
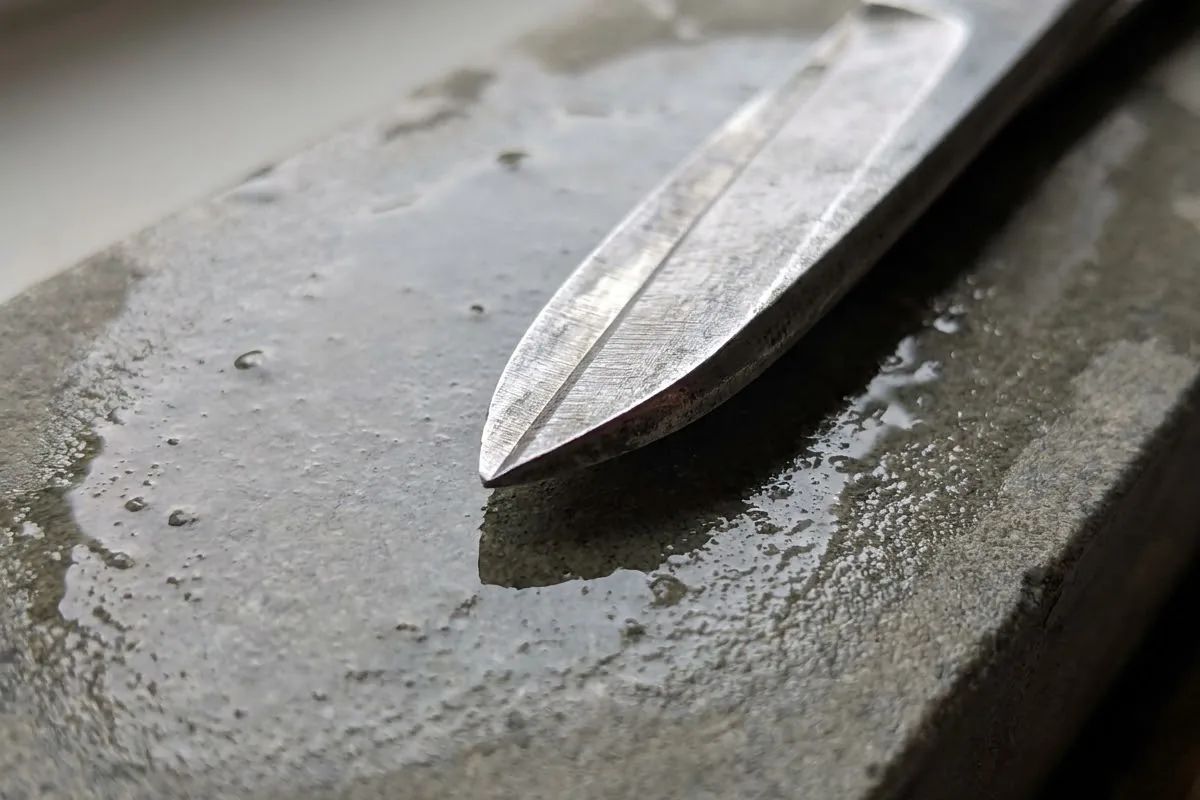
To sharpen scissors with a whetstone, lay the existing bevel flat on the stone, push or draw from the screw area toward the tip with light pressure, and stop as soon as the edge is restored. Keep the factory angle, then remove the burr from the inner side. The sources we opened give angles but no grit values, so we do not invent any.
Belongs to the guide: How to Sharpen Scissors: Methods by Blade Type
A stone lets you rebuild the cutting bevel by hand without a machine deciding the angle for you. It suits plain, straight household blades and is the method most maker guides describe. This page covers the stone-specific detail; the full routine from cleaning to test cut is in the home routine, and the overview of methods is the sharpening guide.
Safety note. A stone puts your hands close to a sharp edge. This is general information; follow the maker’s instructions. OSHA’s hand-tool booklet says safety goggles and gloves must be worn against hand-tool hazards. Stroke away from your body and keep fingers clear. Reviewed by the editorial desk against the cited sources.
When a stone is the right tool
A stone is the right tool when the pair is plain-edged, the bevel is clear and the dullness is ordinary wear. It is the wrong tool for pinking teeth, micro-serrated kitchen blades, convex hair-shear edges or deep nicks. For those, see the free method chooser or the pages on pinking shears and hair scissors.
Grit ranges and what each does
We do not give a grit chart. None of the manufacturer or extension pages we opened states a grit for scissors, and inventing one would be guesswork. What the sources do support:
- Use a sharpening stone or diamond sharpener for the bevel (scissor maker guidance).
- Use a fine stone, ceramic rod or honing steel to remove the burr.
- Diamond stones suit heavy restoration, and finer ceramic stones suit polishing, according to a pruner maker’s guide for garden blades.
Because “a few passes are usually enough,” check often rather than removing extra metal.
Holding the blade: matching the factory bevel
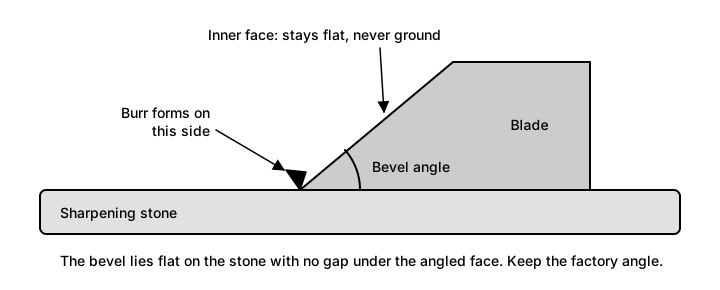
Lay the bevel flat on the stone so there is no gap under the angled face. One sharpener maker states the principle plainly: maintain the angle the manufacturer put on the blade. Its angle figures are about 40 to 45 degrees for typical general-use scissors, 25 degrees for delicate specialty kitchen scissors and 0 degrees for children’s safety scissors. Use these only as a sanity check on what you see on your own pair.
Do not sharpen the flat inner face. Do not rock the blade to “find” the angle; a changing angle rounds the edge.
Strokes, burr and finishing
- Secure the stone on a flat, stable surface and moisten it only if the stone calls for it.
- Draw the blade from the screw area toward the tip with smooth, controlled strokes, always away from your body.
- Count a few passes on the first blade, check, then repeat the same on the second.
- Stop when a burr forms on the non-beveled side. A sharpener maker describes sharpening until a burr forms, then removing it.
- Remove the burr with one light pass of a fine stone, ceramic rod or honing steel over the inner side, without altering the inner surface.
- Wipe, oil the pivot, set the tension and test cut.
A pruner maker’s garden-tool guide, which is not written for scissors, suggests about five to ten strokes along the bevel and a single light pass on the reverse.
Lubrication and cleaning the stone
Follow the stone’s own instructions on water or oil; extension guidance for garden blades says to add a few drops of oil or water depending on the stone. Clean the stone and wipe the blades afterwards so metal particles do not end up on the pivot.
Stones versus other methods
For the quick-fix idea of cutting foil, see what foil does to a blade.
A stone gives control but takes practice. Angle-guide sharpeners remove guesswork but fix an angle that may not match your pair, and one scissor maker advises maintaining the existing blade angle. A professional service is the right choice for specialty edges. For care between sharpenings, see scissor safety and care.
FAQ
What grit should I use to sharpen scissors?
None of the maker or extension sources we opened gives a grit figure for scissors, so we do not state one. Follow the guide supplied with your scissors or stone. Guides ask you to check progress often and finish with a fine stone, ceramic rod or honing steel to remove the burr.
What angle do I hold the scissor blade against the stone?
Match the existing bevel. One sharpener maker's guide says to maintain the angle the manufacturer put on the blade and cites about 40 to 45 degrees for typical general-use scissors, 25 degrees for delicate specialty kitchen scissors and 0 degrees for children's safety scissors. The bevel on your pair outranks any figure in a guide.
Can I use a stone on serrated scissors?
Not as a general rule. One scissor maker lists micro-serrated kitchen scissors as generally best left to a professional, because the teeth make the geometry hard to preserve by hand. Pinking teeth are likewise not for DIY. Check the maker's instructions for your pair, and use a service when the guide is silent.
Do I need oil or water on the stone?
It depends on the stone. Follow the instructions that came with it, because some are used wet or with a few drops of oil and some dry. Garden-tool guidance from extension services says to add a few drops of oil or water depending on the stone. Clean the stone and the blades afterwards so metal particles do not clog the surface.
How many strokes does it take?
Few. One scissor maker says a few passes are usually enough and that you should check progress often rather than remove excess metal. A pruner maker suggests about five to ten strokes for pruning blades. Count your strokes on the first blade and repeat the same number on the second to keep them matched.
Sources
- Victorinox: How to Sharpen Scissors (victorinox.com)
- Work Sharp: How to Sharpen Scissors (worksharptools.com)
- Felco: How to Sharpen and Maintain Your Pruning Tools (america.felco.com)
- University of California Cooperative Extension (Monterey and Santa Cruz Master Gardeners): How to Sharpen Gardening and Pruning Tools (oc4h.ucanr.edu)
- OSHA 3080: Hand and Power Tools (osha.gov)
Keep reading
- How to Sharpen Scissors: Methods by Blade Type
How to sharpen scissors: which method suits household, fabric, pinking, hair and garden blades, how to keep the factory edge, and when to use a pro.
- Does Cutting Aluminum Foil Sharpen Scissors?
Does cutting aluminum foil sharpen scissors? What the opened maker sources say about foil, honing and burrs, and what to do for a truly dull pair.
- How to Sharpen Fabric Scissors Without Ruining Them
How to sharpen fabric scissors without ruining them: why shears dull, what to check first, home options versus a maker or professional service.
- How to Sharpen Garden Scissors and Pruning Shears
How to sharpen garden scissors and pruning shears: clean first, file or stone the bevel side only, remove the burr, oil, and disinfect when needed.
- How to Sharpen Hair Scissors: Options Explained
How to sharpen hair scissors: why shear edges differ from household scissors, what makers say about service versus DIY, and care that delays dulling.
- How to Sharpen Pinking Shears: What Works
How to sharpen pinking shears: why the zig-zag blades are different, what home sharpening risks, what a maker of sharpening equipment says, and care tips.